Plotting
In this tutorial we will assume that you know how to create vectors and matrices, know how to index into them, and know about loops. For more information on those topics see one of our tutorials on vectors, matrices, vector operations, or loops.In this tutorial we will introduce the basic operations for creating plots. To show how the plot command is used, an approximation using Euler's Method is found and the results plotted. We will approximate the solution to the D.E. y'= 1/y, y(0)=1. A step size of h=1/16 is specified and Euler's Method is used. Once done, the true solution is specified so that we can compare the approximation with the true value. (This example comes from the tutorial on loops.)
>> h = 1/16;
>> x = 0:h:1;
>> y = 0*x;
>> size(y)

ans =

     1    17

>> max(size(y))

ans =

    17

>> y(1) = 1;
>> for i=2:max(size(y)),
     y(i) = y(i-1) + h/y(i-1);
   end
>> true = sqrt(2*x+1);
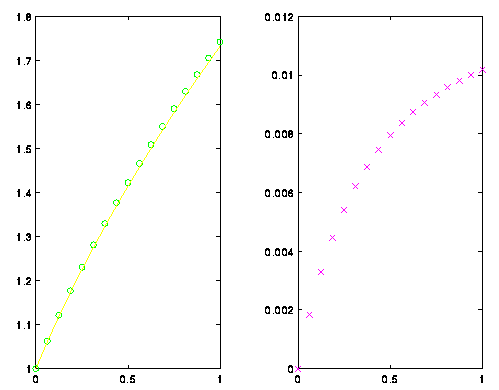
Now, we have an approximation and the true solution. To compare the two, the true solution is plotted with the approximation plotted at the grid points as a green 'o'. The plot command is used to generate plots in matlab. There is a wide variety of arguments that it will accept. Here we just want one plot, so we give it the range, the domain, and the format.>> plot(x,y,'go',x,true)That's nice, but it would also be nice to plot the error:
>> plot(x,abs(true-y),'mx')Okay, let's print everything on one plot. To do this, you have to tell matlab that you want two plots in the picture. This is done with the subplot command. Matlab can treat the window as an array of plots. Here we will have one row and two columns giving us two plots. In plot #1 the function is plotted, while in plot #2 the error is plotted.
>> subplot(1,2,1);
>> plot(x,y,'go',x,true)
>> subplot(1,2,2);
>> plot(x,abs(true-y),'mx')
Figure 1. The two plots from the first approximation
Let's start over. A new approximation is found by cutting the step size in half. But first, the picture is completely cleared and reset using the clf comand. (Note that I am using new vectors x1and y1.)
>> clf
>> h = h/2;
>> x1 = 0:h:1;
>> y1 = 0*x1;
>> y1(1) = 1;
>> for i=2:max(size(y1)),
     y1(i) = y1(i-1) + h/y1(i-1);
   end
>> true1 = sqrt(2*x1+1);
The new approximation is plotted, but be careful! The vectors passed to plot have to match. The labels are given for the axis and a title is given to each plot in the following example. The following example was chosen to show how you can use the subplot command to cycle through the plots at any time.>> plot(x,y1,'go',x,true1)
??? Error using ==> plot
Vectors must be the same lengths.
>> plot(x1,y1,'go',x1,true1)
>> plot(x1,abs(true1-y1),'mx')
>> subplot(1,2,1);
>> plot(x,abs(true-y),'mx')
>> subplot(1,2,2);
>> plot(x1,abs(true1-y1),'mx')
>> title('Errors for h=1/32')
>> xlabel('x');
>> ylabel('|Error|');
>> subplot(1,2,1);
>> xlabel('x');
>> ylabel('|Error|');
>> title('Errors for h=1/16')
Figure 2. The errors for the two approximations 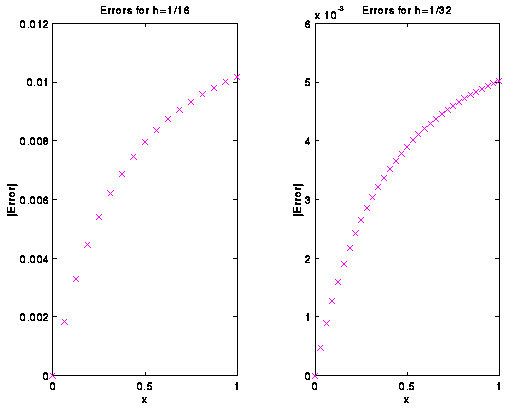
Finally, if you want to print the plot, you must first print the plot to a file. To print a postscript file of the current plot you can use the print command. The following example creates a postscript file called error.ps which resides in the current directory. This new file (error.ps) can be printed from the UNIX prompt using the lpr command.
>> print -dps error.ps
No comments:
Post a Comment